

As Doctors we write about evidence- based facts and with that in mind select products we believe to be the best for our readers. Thelifestylecure.com is a participant of the amazon associates program and we may earn a very small commission from qualifying purchases at no extra cost to you.
Is it possible to do resistance band exercises that results in a good total body workout?
Resistance bands or exercise bands as they are also known, have become more and more popular nowadays. Especially since social media influencers started showing how easy yet effective they are when used properly.
The only problem that I have noticed is that most people tend to use resistance bands in the gym or only during certain times. For example, during a burnout session or only as a warmup exercise. But never as a total body workout.
And yeah there’s nothing wrong with that.
But what if I just want to look like the hot mess that I am, in the comfort of my home, and the only workout equipment I have on hand are resistance bands? Which brings me back to my original question. Is it possible to use just resistance bands and still get a total body workout in?
It most definitely is possible and I’m about to show you how.
But first things first. Let’s define what resistance training is, how it relates to resistance bands and then how you can use them to get a total body workout!
Table of Contents
RESISTANCE TRAINING DEFINITION
An article in the journal of Current Sports Medicine Reports states the definition of resistance training (RT) is:
A form of periodic exercise whereby external weights provides progressive overload to skeletal muscles in order to make them stronger and often result in hypertrophy.
That’s simple enough when broken down. So, let’s break it down.
It is a type of exercise that when done a couple times per week will result in your muscles getting stronger and bigger because you used some type of weight while doing that exercise over a period of time.
And just to be clear, here your body weight is not enough, so you must add an external weight while doing the exercise.
For all intense purposes, I will be discussing what exercises can be done using a resistance band below. However, feel free to use anything that you fancy which can qualify as an external weight. Like hand held weights, ankle weights, a barbell, or a kettlebell.
BENEFITS OF RESISTANCE TRAINING
Now that we know what resistance training means, we also should know what benefits it has and why we should incorporate it into our workout plans.
One benefit it has is that it helps muscles get bigger and when they get bigger, they get stronger too…right?
Absolutely! If we do it the proper way then yes, muscles should strengthen over time.
And we all (I hope) want our muscles to get stronger over time. This is especially true as we age because everyone loses muscle mass as we get older unless we actively try to prevent it from happening.
So, it’s imperative to remember this fact – using weights will only benefit you in the long run because it helps to prevent injuries that we become more prone to (ie. falls, arthritis, etc.) as we age.
Now not all people were created equally. Which is why the human race is unique, beautiful and smart given all of our differences.
Not everyone can use a barbell or a kettlebell. But I feel a lot of those same people could use a resistance band. Unlike a barbell, where you must be strong enough to even place it on your back for say a traditional squat. Or where you must have enough grip strength to perform the exercise properly when using a kettlebell. A resistance band eliminates many of these issues making it one of the safest ‘weights’ that can be used.
The band itself is safe to use for people with joint problems and helps to even stabilize the smaller muscle groups in our body needed for posture and stability.
Plus, it’s also easy to store, carry and requires very little room to even perform a given exercise. Plus did I mention that it’s very cost effective?
Given all the many pros to using one, it’s no wonder that they have become so popular in today’s culture.
TYPES OF RESISTANCE BANDS
Please note that there are a variety of resistance bands available that are of good quality and extremely affordable at this time.
I recommend checking them out on amazon first by reading through the reviews and then selecting one that suits your needs.
A lot of bands are looped and come in 3-6 different types of weight and color. So, if you buy one set it may only have 3 different types of bands from light, medium, to heavy weight printed on it and another set may have 5 different types of bands listed from lightest to heaviest.
They also come in longer un-looped bands with handles (known commonly as resistance tubing) or no handles depending upon the type of exercise you plan on doing.
And there is no wrong one to choose from (another beauty about using resistance bands). It is up to YOU, the consumer, to decide which one you are most comfortable with and actually need for your type of workout.
Personally, I never knew how useful bands could be. Initially I thought they were a waste of time. And boy was I wrong.
I use them every single day that I go to the gym or workout from home now. I use them while warming up and also while doing some compound movements, like a deadlift or even a squat. It allows me to activate my glutes (during warmup) and then helps to keep them engaged throughout the movements.
I also find that sometimes it adds extra resistance for the moves that I may not be comfortable (or confident in) without having to add on extra weights to my bar.
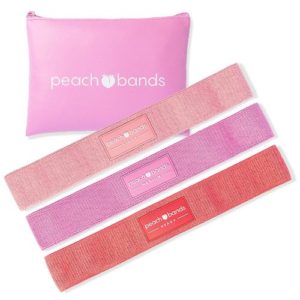
I first tried these peach bands from a friend who got me hooked on to them so much that I purchased a pair for myself. I use the latex ones during my warm-up (and sometimes while doing squats) and the fabric ones for deadlifts, glute bridges, and hip thrusts.
I find the fabric ones are a lot stronger and doesn’t roll up or lose resistance even with time. The latex ones are more convenient and can be whipped out and used anywhere regardless of how much space you DON’T have (like while travelling).
If you are interested in the latex made ones check out the link for Peach Band Resistance Bands Set

If you are interested in the fabric bands check out the link Peach Bands Hip Band Set- Fabric Resistance Set.
OVERVIEW OF RESISTANCE BAND EXERCISES
In this post I would specifically like to go over some exercises that can be done at home using only resistance bands for a quick but brutal workout.
There is no age limit or restriction on the type of exercises I have chosen, rather I am trusting you to do the ones that leave a positive impression on you.
Feel free to add/subtract other ones that you may feel more comfortable doing or you’ve noticed personal results from.
I am going to divide the information based upon either an upper body workout or a lower body workout.
As well, all of the following can be done in the comfort of your living room/space. Feel free to use a chair for stability and remember that some can be done either standing or performed lying down.
It’s safe to do them all in one day (followed by a rest day), combining some and leaving some out, or just doing one instead of the other. It’s all up to you!
We’ve rounded up the top 11 resistance band exercises for you total body workout below so be sure to check them out!
Let’s start!
11 Resistance Band/Tubing Exercises for a Total Body Workout
Upper Body Workout using Resistance Bands:
Complete one or more sets for 20 repetitions each. Ideal would be 3 sets of 20 reps.
Chest press:

- Start by standing shoulder width apart (feet should be directly under your shoulders). Suck in your stomach – you want to keep your abs braced at all times. And keep your knees soft; slightly bent knees prevent injury.
- For a looped band begin by putting your arms through it, either above or below the elbows but never right at the elbows. Keep your arms straight out at chest level with your palms facing down.
- Now in a slow controlled manner (concentrate on using your chest muscles), bend at your elbows so that your elbow to shoulder joints now form a letter ‘t’ with the rest of your body.
- Return to starting position and repeat. Remember to never lock your elbows; meaning do not completely straighten your arms, there should always be a slight bend.
*Note that this exercise can be done with an un-looped band as well. Grasp the ends of the band in either hand and place it behind your back, under the arms at chest level.
Bicep Curl:

- Once again begin by standing shoulder width apart with slightly bent knees and stomach braced.
- Grasp the ends of the band in either hand, keep one arm slightly below waist level with palm facing down and the other ‘working’ arm should be right above it with your palm facing up.
- Keeping your wrist straight and elbows tucked in close to your body, start by bending your working arm at the elbow (opposite arm should not move) towards that same shoulder or up to as high as you can go while maintaining proper form.
- Slowly lower back down and repeat. Make sure to work the opposite side once you have completed your set. Or choose to work both sides at the same time.
*Note that this exercise can be done with looped bands (grasp it with both hands and repeat the same moves) and/or with un-looped bands with handles by standing on the band, shoulder width apart and grasping the handles in either hand. With the un-looped bands you would do the movement on both sides at the same time instead of working one side at a time.
Upright row:

- Begin by standing on your band, hip width apart, knees slightly bent, chest upright and tummy tucked.
- Hold one end in each hand (palms facing down) at the front of your body. Begin by leading with your elbows, having them extend out to your sides. Try and lift your hands to right below shoulder height.
- Squeeze your shoulder blades at the top, hold for a second, and then return to starting position. Repeat.
Pull-Apart:

- Stand hip width apart, hold the resistance band with both hands at shoulder height, about a foot distance apart in front of your body.
- Slowly begin by pulling the band apart by moving your hands out to the side (still at shoulder height). Pull your shoulder blades back and together and expand your chest.
- Bring your arms back to the center after holding for one second. Repeat.
Thruster:

- Begin by standing on the band shoulder width apart, grabbing each end of the band and bringing your hands to shoulder height.
- The resistance band should come over the back of your shoulders and your elbows should be pointed outwards.
- Hinge forward at your hips, sit back into a squat and lower until your knees are parallel to the ground (if you can).
- Press through your heels to stand back upright, squeezing your butt as you lift and at the same time press your arms overhead, extending fully.
- Slowly lower arms back down to shoulders. Repeat.
Lower Body Workout using Resistance Bands:
Complete one or more sets for 20 repetitions each. Ideal would be 3 sets of 20.
Lateral Walk:

- Start with looping the band around either your thighs (above the knees) or slightly above the ankles.
- Begin by lowering yourself down into a squatting position – hinge at the hips and let your butt sit back and down as far as you feel most comfortable.
- Start by moving sideways in one direction while maintaining this squat position; take one large step (a little more than hip distance apart) to the right side of the room, continue for 5 (or how much ever you have room for) more steps in that same direction.
- Repeat this movement by walking back toward the left side of the room now.
Lateral Leg Raise/Abduction:

- Begin by standing shoulder width apart, brace your abs, and knees slightly bent.
- Loop the resistance band around your ankles, stabilize all your weight onto one side of the body by planting that foot on the ground and slowly raise your opposite leg out towards the side of your body by contracting your glutes, quads and hamstrings.
- During this movement keep your foot flexed and only go as far as comfortably possible. Slowly return to starting position.
- Your hip and shoulder should not move at all during this movement. Repeat on opposite leg.
*Note use a chair to help you stabilize while you move the opposite leg. For example, keep the chair on the same side as the stationary leg.
Glute Kickbacks:

- Begin by looping the band around your ankles.
- Stand with your feet hip width apart, keep your pelvis tucked under and having your abs braced.
- Have a chair in front of you for support or keep your hands on your hips. Shift all your weight into one leg but with a soft knee and place your opposite side toes on the ground, far away enough so that there is tension in the band.
- Kick that leg 4-6 inches back, keeping that knee straight. Return to starting position but still maintaining tension in the band as you return. Repeat.
Hamstring Curl:

- Begin by standing behind a chair and placing both hands on it. Loop the resistance band around your ankles and stabilize one leg making sure the knee is slightly bent.
- Start by moving the opposite leg back by bending at your knee, 90 degrees towards your buttocks.
- It’s almost as if you are kicking yourself in the butt. Contracting your hamstring (calf muscle) and having your foot flexed throughout the movement is essential.
- Slowly lower to starting position. Repeat on opposite side.
Squat:

- Begin by looping the band either around your thighs or your above the ankles.
- Start by standing shoulder width apart, toes slightly pointed outwards, brace your abs and have your knees slightly bent.
- Bend your knees, push your hips back and lower yourself into a squat.
- Make sure your back is flat and you are going straight down (your chest should be upright).
- Stand back up by pushing through your heels and squeezing your butt as you lift yourself up. Repeat.
Glute Bridge:

- Begin by lying on your back with a medium weighted band around your thighs, keep your hands at your sides and legs should be hip distance apart.
- Bend your knees to 90 degrees while keeping your feet firmly on the ground.
- While keeping your abs braced (push them into the floor), lift your butt towards the ceiling by pushing through your heels until your body makes a straight line from your knees – shoulders and squeeze your butt at the top.
- Maintain tension in the band and hold for a few seconds at the top. Slowly lower yourself back down.
Thanks so much for reading! Hope you have walked away with some knowledge, insight, and motivation. Keep it pushing.
Note:
All pics and/or gifs are attributed to the following: Self, Fitbit, Women’s Health Magazine, and We Heart Living.
Check out more workouts to get your best life!
Top 9 Fat Burning HIIT Workouts: For Beginners And Advanced!
4 Minute Flat Belly Workout Plan!
Top 11 Weight Loss Yoga Poses For Beginners
11 Absolute Best Yoga Poses For Beginners
